
A comprehensive guide about the sanding and polishing process, offering insights into the tools, techniques, and benefits. Understanding the subtle details of these procedures will help you recognize the skills and craftsmanship involved, ensuring your floors look impeccable for years.
Get a Free Quote Call: 0418 882 678
Why Wooden Floor Sanding Is Important and When you Need One
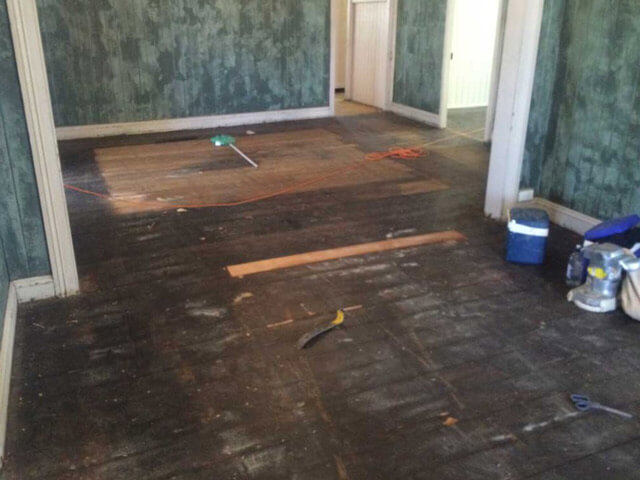
Timber floors usually last decades with proper care but these factors play crucial role in scuffing, damaging boards, polish and top coats resulting in dull, uneven and hideous looking wooden floors.
Lobby And Kitchen
High traffic areas such as lobby and kitchen and main entrance get most of the brunt force of show screeching. These areas usually end up looking like a blob of yellowish scar on the floor and sometimes even dented inwards because of no timely care. Use rubberized mats in high traffic areas. When an area starts shining like a dull mirror, that’s when the area is too far gone. So, get it sanded and polished before that stage.
Heavy Furniture And Other Causes Of Damage
Heavy objects like furniture not only easily scratch the top coat but can also bend or break the boards. Use felt or carpet/rubber at the contact area. Never drop heavy objects on wood. If some boards get bent or damaged because of furniture, don’t use a hammer to fix it yourself because doing so may damage the adjacent boards and it will look like a mess.
Wood Swell And Deformity
Humidity can cause wooden boards to swell and ultimately permanently change the original shape and this is the main cause of uneven floors. In Brisbane, the humidity level is high and you can keep it lower with air conditioning and other de-humidifier appliances but a simple solution is not to spill water. Do not use pressure washer or steam cleaner.
Mold And Termite
Mold and termites may cause irreparable damage to your timber and we suggest immediate replacement of damaged boards with same type of wooden planks but with termite and fungus treatment and then go for sanding and polishing. Our team can examine your boards and devise a perfect strategy for damaged planks.
Floor Preparation
All other trade work should be completed before any floor sanding process takes place. Our floor sanders will require electricity and lighting to begin. Newly purchased homes often need to have the electricity reconnected before we can commence this work.
It is ideal to have all painting completed, except for the final coat on the skirting boards, as our floor sanding equipment will come into contact with the skirting boards during the sanding and polishing process.
Any electrical and gas appliances should be disconnected or turned off.
Timber floor coatings can sometimes seep through the timber tongue and groove boards, so we advise moving or covering items stored under the area being polished.
All coverings and furniture must be removed from the area requiring sanding. We can organize covering removal at an extra cost if needed. Undertaking the removal of all tacks and staples yourself will reduce your cost.
Detailed Floor Sanding Process
The sanding process begins with punching exposed nails below the surface. If the wood has an existing coating, we first remove it with coarse sandpaper. At this point, we will also repair or replace any floorboards that require attention.
Damage and Condition Assessment of the Floor:
The first step in timber floor sanding is a detailed inspection. Our professionals visit the site to analyze the floor condition, assess the scope of work, and identify specific issues such as:
- Previous Coatings: Any existing surface treatment that needs to be removed before sanding.
- Surface Damages: Scratches, dents, scuffs, and fading that affect the aesthetic appeal of the floor.
- Gaps between floorboards: Gaps and cracks between the floorboards that may compromise structural integrity. The initial assessment helps the team choose the appropriate sanding technique and the best coating for your floor.
Preparation of the Area: Effective floor preparation is key to a successful process. Turn off electrical and gas appliances before starting the sanding process. The following are the preparatory steps for sanding and polishing the floor:
- Clearing the clutter: All rugs, furniture, and decorative items are removed or covered with protective sheets to create an obstruction-free workspace.
- Complete the wall painting: It is ideal to complete the wall painting before starting the sanding process. Leave the final coat on the skirting boards, as our sanding equipment will come into contact during the sanding and polishing process.
- Electricity and Lighting Provision: Our sanders will require electricity and lighting to start and complete your polished timber floors. Newly purchased homes often need to have the electricity reconnected before we begin.
- Protecting other areas of the house: Dust can spread during sanding, so other rooms are sealed off with plastic sheeting to prevent dust accumulation. Timber coatings can sometimes seep through the timber tongue and groove boards, so we advise moving or covering items stored under the wooden floors being polished.
- Inspecting for loose nails and screws: The team checks for loose boards, protruding nails, or other damage and repairs them to ensure a smooth and effective sanding process. All exposed nails are punched below the surface. If the timber floor has an existing coating, we remove it with coarse sandpaper. At this point, we will repair or replace floorboards that require attention.
- Choosing the Right Sandpaper Grit: Different grit sandpapers are used depending on the floor’s condition. Heavily damaged or coated floors may require a coarse grit, while finer grits are used for a smooth surface.
Floor Sanding Process: The sanding process is the heart of the restoration work. It involves using specialized machines to eliminate scratches, stains, and old coatings. Our team uses the best machines in the timber flooring industry, such as the Canadian Galaxy drum machine. The sanding process prepares the floor for its new protective layer. The floor sanding process involves:
- Belt Sanding: The first stage involves a powerful belt sander that works efficiently on large, flat areas. It removes the old coating and smooths out the wood. A coarse grit sandpaper initially separates the bulk of the damaged top layer and prepares the floor. The machine must be handled carefully to avoid uneven sanding.
- Edge Sanding: An edge sander works along the perimeter, where the belt sander cannot reach. It is a small and easy-to-handle machine that sands the edges and corners of the space. The team ensures consistency in the sanding, paying close attention to these areas.
- Corner Sanding: To ensure a flawless appearance, detail sanders or hand tools are employed for difficult-to-reach areas. Budget Floor Sanding professionals use precision tools to maintain consistency throughout the room.
- Fine Sanding: Fine-grit sandpaper is used to refine the surface once the bulk of the work is done with coarse-grit sandpaper. It creates a smooth, even surface that’s ready for the protective application. This stage removes any residual scratches or imperfections.
Dust Control: Dust particles spread during the sanding process and can be irritating for the sanding team and homeowners. Our advanced equipment uses dustless sanding technology that traps airborne particles, making the process cleaner and safer.
- Dustless Sanding: Dustless sanding machines are equipped with vacuum systems to capture dust at the source. This ensures a healthier environment and minimal mess during the project.
- Post-Sanding Cleaning: After sanding, our team will clean the area with a vacuum and cloth. The floor, walls, and windows are cleaned to remove dust and wood particles. Post-sanding cleanup prepares the floor for the next step.
Detailed Floor Polishing Process
Floor polishing enhances the timber’s beauty and durability. The process involves applying protective coatings. It gives the floor a glossy or matte look and protects it from wear, moisture, and UV damage.
1. Choosing the Right Coating for the Floor: There is a range of coatings available to suit different preferences and flooring types. The choice of coating depends on factors such as the amount of foot traffic the area receives, the type of wood, and the desired aesthetic. Floor coatings include gloss, satin, and matte. We offer a selection of solvent-based, polyurethane, environmentally friendly water-based, and traditional oil-based coatings.
- Natural Oils and Waxes: Ideal for people who prefer a natural look for their floors. They penetrate the wood for nourishment and protection. They may require more frequent maintenance than synthetic coatings.
- Hard Wax: This is a combination of natural oils and synthetic resins. Hard wax oils provide a protective layer while maintaining the natural look of the wood. They are easy to maintain and offer good durability.
- Water-Based Polyurethane: These have quick drying times, low VOC content, and are eco-friendly. This coating provides a durable, clear layer that enhances the natural color of the wood.
- Oil-Based Polyurethane: It is highly durable and suitable for high-traffic areas and offers a warm, amber tone. However, it has a longer drying time and emits more fumes compared to water-based options.
2. Application of Floor Polish: The application process starts after the sanding is completed and the floor is cleaned. The process varies slightly depending on the type of coating used.
- Wood Sealing: Wood sealant prepares the floor to take the coating well. The sealant provides an extra layer of protection. This step is crucial for porous woods like pine or oak.
- First Coat: The first coat is applied using high-quality applicators. The team ensures an even layer across the entire floor. Depending on the type of coating, this layer requires a day to dry completely.
- Buffing: The floor is lightly buffed using a fine abrasive pad as the first coat dries. This step ensures that the next coat adheres properly and smooths out any imperfections.
- Subsequent Coats: Dust is removed before the next coat is applied. The second coat gives extra shine and protection to the floor. Generally, we apply 3 coats to the floor, and the process takes 3 to 4 days to complete. Each coat is carefully spread, ensuring there are no streaks, bubbles, or missed spots.
- Final Buffing: The team may perform a final buff after the final coat dries to enhance the floor’s sheen and smoothness. A thorough inspection ensures that the floor is flawless, smooth, and ready for use.
Get a Free Quote Call: 0418 882 678
Curing and Drying Time
Curing time is the period required for the floor coating to reach its maximum durability and strength. It is different for various coatings. Oil-based coatings take longer to dry (6-12 hours) and cure (a week or more) than water-based coatings (2-4 hours drying time and 2-3 days to cure). Avoid furniture movement and walking before it dries.
Benefits of Professional Floor Sanding and Polishing
Budget Floor Sanding’s professional services offer numerous benefits that go beyond what DIY restoration can achieve. Some key advantages include:
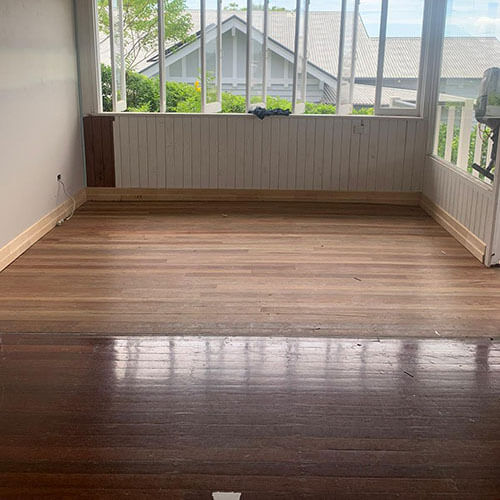
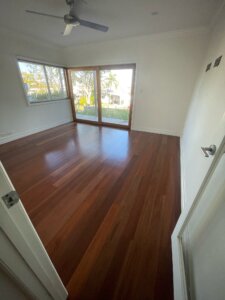
- Increased Aesthetics: Sanding and polishing beautify your homes by enhancing the grain patterns and color. These processes restore the natural beauty. Our dedicated team brings out the best look of your floors with the coating and staining of your choice.
- Promising Longevity: Regular sanding and polishing extend the lifespan of timber floors by protecting them from damage caused by everyday wear and tear. They will stay strong and durable for years to come through sanding and polishing.
- Increased Property Resale Value: Well-maintained wooden floors add significant value to a property and increase its resale value. Beautifully polished wood can be a key selling point when you plan to sell or rent out your home.
- Healthy Indoor Environment: Low-VOC coatings and dustless sanding methods make interior spaces healthier and cleaner. In addition to being easier to clean, properly sanded and sealed floors lessen the buildup of dust, allergens, and filth.
- Customization Liberty: Budget Floor Sanding offers customization options, from selecting the type of coating that matches your style and the overall décor of your space.
Special Considerations for Brisbane Homes
The longevity of your floors depends on maintenance and the local climate. Expansion and contraction of timber can lead to issues such as gaps, cracks, and moisture damage. We understand these challenges and tailor our services to address them effectively.
- Moisture and Humidity Control: Changes in humidity in the air have a significant impact on the structural integrity of timber floors. We ensure that moisture levels are checked and controlled during the sanding process to prevent problems such as cupping or crowning after the protective layer is applied.
- Protection from UV rays: Brisbane’s sunny weather means that wood is exposed to sunlight, especially decks and verandahs. UV rays in sunlight, which pass through windows and reflect on the floor, can cause fading and discoloration. Modern UV-resistant coatings protect it and keep it vibrant for a long time.
Maintenance Guidelines for Brisbane Homes
It’s important to follow proper maintenance practices to extend the life of your newly sanded and polished floors.
- Use area rugs and mats in high-traffic areas, like doorways, lounges, and living rooms, to prevent early fading, scratches (from pets and furniture dragging), and warping of the floor. Avoid walking with heels.
- Avoid excessive moisture by cleaning up spills immediately and using a damp cloth for cleaning.
- Avoid harsh cleaning chemicals on polished surfaces. Wood-specific products available in the market are safe to use. Use a mild detergent and a chemical-free liquid cleaner for cleaning the floor.
- Periodic sanding and re-polishing refresh the protective layer, increase longevity, and maintain the floor’s beauty.
- Use curtains or blinds to limit direct sunlight exposure. UV rays can cause the timber to fade over time.
Budget Floor Sanding’s Commitment and Professionalism
Our company takes pride in its environmentally conscious approach to floor restoration and repair. We ensure minimal impact on the environment by using eco-friendly, low-VOC products. The exceptional results are due to dust-free sanding technology and our dedication to work. Our efficient work reduces waste and air pollution, contributing to a greener, cleaner Brisbane.
Why Choose Budget Floor Sanding?
Budget Floor Sanding stands out in Brisbane’s industry due to:
- Our expertise in combating floor issues ensures high-quality results for every project.
- State-of-the-art equipment provides dust-free sanding and high-end polishing services.
- Our knowledge about Brisbane’s climate helps us to offer tailored services that address local flooring challenges like humidity, wear, and sun exposure.
- Budget-friendly services: Our commitment to providing high-quality services at affordable rates sets us apart in the community. Our services are accessible to a diverse range of customers.

Conclusion
Whether you’re renovating your home or looking to maintain your commercial property, sanding and polishing offer a reliable, efficient, and affordable solution for all your floor restoration needs. These processes enhance the natural beauty of the wood while protecting it from the elements.
Investing in professional floor sanding and polishing can improve the aesthetics of your space, extend its life, add value to your property, and create a healthier living environment.
Get a Free Quote Call: 0418 882 678
Frequently Asked Questions About the Floor Sanding And Polishing Process in Brisbane
Is it necessary to remove my furniture before the floor sanding process?
We recommend moving the furniture and other movable items from the sanding area to expose the maximum floor. It will ensure unobstructed access to the entire floor surface, ensuring thorough and even sanding.
Can Budget Floor Sanding remove old floor coverings?
Yes, our team can remove old floor coverings, such as carpets, rugs, protective sheets, etc. It will be an additional cost and added to the quote.
What becomes of the exposed nails on the wooden floor during the sanding process?
Exposed nails interfere with the sanding process, as they can stick to the machines and damage the equipment. All the exposed nails and loose screws are fixed before the sanding process for smooth and even sanding.
How are color variations handled between the replaced and the original floorboards?
There are two ways in which color variations between the original and replacement floorboards are addressed.
- Sourcing a floorboard from an inconspicuous area of the house( attic or basement) to match the damaged one.
- Staining the sourced floorboard to blend with the surrounding original ones. This attention to color matching ensures a seamless and cohesive appearance.
What should be the frequency of sanding and polishing timber floors?
The frequency of sanding and polishing timber floors depends, should typically be sanded and polished every 10 to 15 years, depending on the amount of wear and tear they experience. High-traffic areas may need attention sooner, while low-traffic areas may last longer before needing it.
How to maintain polished timber floors?
There are maintenance guidelines for newly polished timber floors, provided by the sanding company. Maintenance tips are:
- Use area rugs and mats in high-traffic areas.
- Wipe spills with a dry cloth immediately, followed by damp mopping to avoid moisture damage.
- Avoid using harsh chemicals on the polished surface for cleaning. Regular dusting reduces the need to clean the floor with harmful chemicals and cleaners.
Can all types of timber floors be sanded and polished?
The intensity of sanding timber depends on the thickness of the veneer. Solid hardwood floors (Oak, Maple, Jarrah, etc) are pure wood planks and can last for decades with periodic sanding.
- Old and extensively damaged floors cannot be sanded without professional inspection and require repair or replacement.
- Engineered timber floors with a thick top layer of hardwood can be sanded for few times.
How long should we wait before walking on the floor after polishing?
The waiting time before you can walk on the floor after polishing depends on the type of finish used. For water-based finishes, you can usually walk 24 hours after the final coat is applied; for oil-based finishes, wait 2-3 days before walking.
How long floor polish last?
The longevity of floor polishing depends on various factors such as maintenance, the level of foot traffic, and the type of finish used. In low-traffic areas, the finish can last up to 10-15 years, while in high-traffic areas, the finish may need to be refreshed every 3-5 years.
Get a Free Quote Call: 0418 882 678