
What Is Floor Sanding process?
Floor sanding is a multi-stage timber restoration process that strips away old coatings, scratches, and surface damage to reveal the raw hardwood beneath, ready for a fresh protective finish. In Brisbane, where humidity levels fluctuate year-round, the process demands careful moisture assessment, the right sandpaper grit sequence, and climate-appropriate coatings to prevent issues like cupping, crowning, and premature wear. At Budget Floor Sanding, we have refined this process over decades of working with Queenslander homes, hardwood species like Spotted Gum, Blackbutt, and Tallow wood, and Brisbane’s unique subtropical conditions. Below, we walk you through every stage from initial floor assessment and preparation through sanding, dust control, coating selection, and final curing. So you know exactly what to expect before your floors are transformed.
Get a Free Quote Call: 0418 882 678
When Do Timber Floors Need Sanding?
Timber floors usually last decades with proper care but these factors play a crucial role in scuffing, damaging boards, polish and top coats resulting in dull, uneven and hideous looking wooden floors.
Lobby And Kitchen
High traffic areas such as lobby and kitchen and main entrance get most of the brunt force of shoe screeching. These areas usually end up developing a yellowish, scarred appearance on the floor and sometimes even dented inwards because of no timely care. Use rubberized mats in high traffic areas. When an area starts shining like a dull mirror, that’s when the area is too far gone. So, get it sanded and polished before that stage.
Heavy Furniture And Other Causes Of Damage
Heavy objects like furniture not only easily scratch the top coat but can also bend or break the boards. Use felt or carpet/rubber at the contact area. Never drop heavy objects on wood. If some boards get bent or damaged because of furniture, don’t use a hammer to fix it yourself because doing so may damage the adjacent boards and it will look like a mess.
Wood Swell And Deformity
Humidity can cause wooden boards to swell and ultimately permanently change the original shape and this is the main cause of uneven floors. In Brisbane, the humidity level is high and you can keep it lower with air conditioning and other de-humidifier appliances but a simple solution is not to spill water. Do not use pressure washer or steam cleaner.
Mold And Termite
Mold and termites may cause irreparable damage to your timber and we suggest immediate replacement of damaged boards with same type of wooden planks but with termite and fungus treatment and then go for sanding and polishing. Our team can examine your boards and devise a perfect strategy for damaged planks.
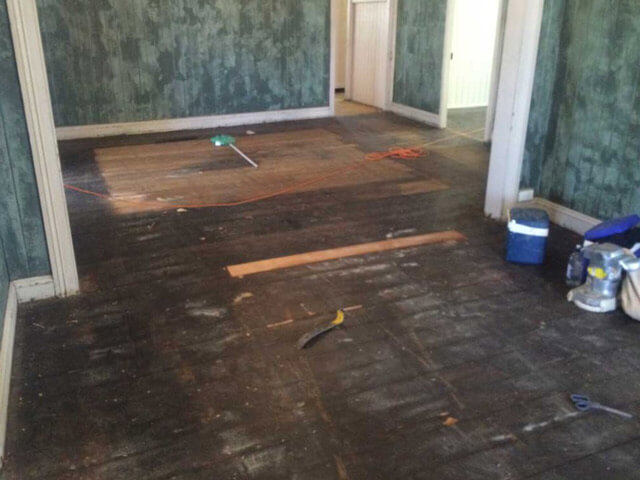
Step-By-Step Floor Sanding Process
The sanding process begins with punching exposed nails below the surface. If the wood has an existing coating, we first remove it with coarse sandpaper. At this point, we will also repair or replace any floorboards that require attention.
Step 1 – Floor Inspection & Assessment
The first step in timber floor sanding is a detailed inspection. Our professionals visit the site to analyze the floor condition, assess the scope of work, and identify specific issues such as:
- Previous Coatings: Any existing surface treatment that needs to be removed before sanding.
- Surface Damages: Scratches, dents, scuffs, and fading that affect the aesthetic appeal of the floor.
- Gaps between floorboards: Gaps and cracks between the floorboards that may compromise structural integrity. The initial assessment helps the team choose the appropriate sanding technique and the best coating for your floor.
Step 2 – Room Preparation
Effective floor preparation is key to a successful process. Turn off electrical and gas appliances before starting the sanding process. The following are the preparatory steps for sanding and polishing the floor:
- Clearing the clutter: All rugs, furniture, and decorative items are removed or covered with protective sheets to create an obstruction-free workspace.
- Complete the wall painting: It is ideal to complete the wall painting before starting the sanding process. Leave the final coat on the skirting boards, as our sanding equipment will come into contact during the sanding and polishing process.
- Electricity and Lighting Provision: Our sanders will require electricity and lighting to start and complete your polished timber floors. Newly purchased homes often need to have the electricity reconnected before we begin.
- Protecting other areas of the house: Dust can spread during sanding, so other rooms are sealed off with plastic sheeting to prevent dust accumulation. Timber coatings can sometimes seep through the timber tongue and groove boards, so we advise moving or covering items stored under the wooden floors being polished.
- Inspecting for loose nails and screws: The team checks for loose boards, protruding nails, or other damage and repairs them to ensure a smooth and effective sanding process. All exposed nails are punched below the surface. If the timber floor has an existing coating, we remove it with coarse sandpaper. At this point, we will repair or replace floorboards that require attention.
- Choosing the Right Sandpaper Grit: Different grit sandpapers are used depending on the floor’s condition. Heavily damaged or coated floors may require a coarse grit, while finer grits are used for a smooth surface.
Step 3 – Coarse Sanding
The first stage involves a powerful belt sander that works efficiently on large, flat areas. It removes the old coating and smooths out the wood. A coarse grit sandpaper initially separates the bulk of the damaged top layer and prepares the floor. The machine must be handled carefully to avoid uneven sanding.
Step 4 – Edge & Corner Sanding
Edge Sanding: An edge sander works along the perimeter, where the belt sander cannot reach. It is a small and easy-to-handle machine that sands the edges and corners of the space. The team ensures consistency in the sanding, paying close attention to these areas.
Corner Sanding: To ensure a flawless appearance, detail sanders or hand tools are employed for difficult-to-reach areas. Budget Floor Sanding professionals use precision tools to maintain consistency throughout the room.
Step 5 – Fine Sanding & Smoothing
Fine-grit sandpaper is used to refine the surface once the bulk of the work is done with coarse-grit sandpaper. It creates a smooth, even surface that’s ready for the protective application. This stage removes any residual scratches or imperfections.
Step 6 – Dust Extraction & Cleaning
Dust particles spread during the sanding process and can be irritating for the sanding team and homeowners. Our advanced equipment uses dustless sanding technology that traps airborne particles, making the process cleaner and safer.
- Dustless Sanding: Dustless sanding machines are equipped with vacuum systems to capture dust at the source. This ensures a healthier environment and minimal mess during the project.
- Post-Sanding Cleaning: After sanding, our team will clean the area with a vacuum and cloth. The floor, walls, and windows are cleaned to remove dust and wood particles. Post-sanding cleanup prepares the floor for the next step.
Sandpaper Grit Guide for Timber Floor Sanding
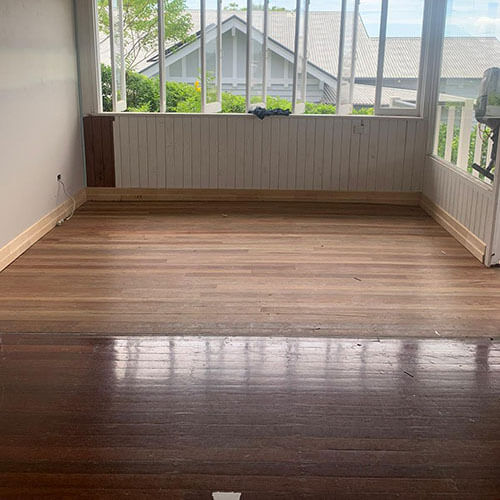
Floor Polishing & Coating Process
Floor polishing enhances the timber’s beauty and durability. The process involves applying protective coatings. It gives the floor a glossy or matte look and protects it from wear, moisture, and UV damage.
Choosing the Right Coating for the Floor: There is a range of coatings available to suit different preferences and flooring types. The choice of coating depends on factors such as the amount of foot traffic the area receives, the type of wood, and the desired aesthetic. Floor coatings include gloss, satin, and matte. More information about different coating is available on polish page.
Application Process of Floor Polish: The application process starts after the sanding is completed and the floor is cleaned. The process varies slightly depending on the type of coating used.
- Wood Sealing: Wood sealant prepares the floor to take the coating well. The sealant provides an extra layer of protection. This step is crucial for porous woods like pine or oak.
- First Coat: The first coat is applied using high-quality applicators. The team ensures an even layer across the entire floor. Depending on the type of coating, this layer requires a day to dry completely.
- Buffing: The floor is lightly buffed using a fine abrasive pad as the first coat dries. This step ensures that the next coat adheres properly and smooths out any imperfections.
- Subsequent Coats: Dust is removed before the next coat is applied. The second coat gives extra shine and protection to the floor. Generally, we apply 3 coats to the floor, and the process takes 3 to 4 days to complete. Each coat is carefully spread, ensuring there are no streaks, bubbles, or missed spots.
- Final Buffing: The team may perform a final buff after the final coat dries to enhance the floor’s sheen and smoothness. A thorough inspection ensures that the floor is flawless, smooth, and ready for use.
Curing and Drying Time
Curing time is the period required for the floor coating to reach its maximum durability and strength. It is different for various coatings. Oil-based coatings take longer to dry (6-12 hours) and cure (a week or more) than water-based coatings (2-4 hours drying time and 2-3 days to cure). We discussed this topic in-depth on polishes page.
Benefits of Professional Floor Sanding and Polishing
Budget Floor Sanding’s professional services offer numerous benefits that go beyond what DIY restoration can achieve. Some key advantages include:
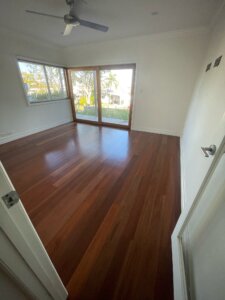
- Increased Aesthetics: Sanding and polishing beautify your homes by enhancing the grain patterns and color. These processes restore the natural beauty. Our dedicated team brings out the best look of your floors with the coating and staining of your choice.
- Promising Longevity: Regular sanding and polishing extend the lifespan of timber floors by protecting them from damage caused by everyday wear and tear. They will stay strong and durable for years to come through sanding and polishing.
- Healthy Indoor Environment: Low-VOC coatings and dustless sanding methods make interior spaces healthier and cleaner. In addition to being easier to clean, properly sanded and sealed floors lessen the buildup of dust, allergens, and filth.
- Customization Liberty: Budget Floor Sanding offers customization options, from selecting the type of coating that matches your style and the overall décor of your space.
Special Considerations for Brisbane Homes
The longevity of your floors depends on maintenance and the local climate. Expansion and contraction of timber can lead to issues such as gaps, cracks, and moisture damage. We understand these challenges and tailor our services to address them effectively. If you want to see the full list, please visit maintenance page.
Maintenance Guidelines for Brisbane Homes
It’s important to follow proper maintenance practices to extend the life of your newly sanded and polished floors. More tips available at our floor maintenance page.
Frequently Asked Questions About the Floor Sanding And Polishing Process in Brisbane
How Are Exposed Nails Handled During Floor Sanding?
Exposed nails interfere with the sanding process, as they can stick to the machines and damage the equipment. All the exposed nails and loose screws are fixed before the sanding process for smooth and even sanding.
What should be the frequency of sanding and polishing timber floors?
The frequency should typically be sanded and polished every 10 to 15 years, depending on the amount of wear and tear they experience. High-traffic areas may need attention sooner, while low-traffic areas may last longer before needing it.
How Does the Sanding Process Differ by Timber Type?
The intensity of sanding timber depends on the thickness of the veneer. Solid hardwood floors (Oak, Maple, Jarrah, etc) are pure wood planks and can last for decades with periodic sanding.
- Old and extensively damaged floors cannot be sanded without professional inspection and require repair or replacement.
- Engineered timber floors with a thick hardwood veneer can be sanded a limited number of times.
How long should we wait before walking on the floor after polishing?
The waiting time before you can walk on the floor after polishing depends on the type of finish used. For water-based finishes, you can usually walk 24 hours after the final coat is applied; for oil-based finishes, wait 2-3 days before walking.
Get a Free Quote Call: 0418 882 678